As medical students it can be hard at times to find ways to contribute to the care of our patients and teams. Sure, we see and evaluate patients on our own, but that doesn't preclude a more senior member from also doing their own evaluation, work-up, and note. Most everything we do needs to be approved or observed: our orders must be signed, procedures must often be carried out under watchful eyes, and patients are sometimes (understandably so!) unwilling to let the junior members of the team practice basic skills on them. When you know that asserting yourself in the care of your patient requires everyone else to chip in, it is easy to feel like a burden rather than a team player, especially in the fast-paced and busy environment of the emergency room.
The flip side, of course, is that if you can find a way to carve out a niche for yourself by owning certain areas of your patients' care, you can work within the team to ease the workload of everyone around you and drive patient care forward. Along the way your procedural skills, confidence, and overall usefulness will grow. If you are really diligent you may even find that patients, residents, and, yes, even nurses will begin to trust you with more responsibility. With that in mind, here’s a list of 5 ways you can add value to your patients and your team as a sub-intern, with some advice to help you avoid beginner pitfalls.
1. IV Placement:
How essential is this skill? Consider that an IV is used for delivering fluids, blood products, medications, contrast, and drawing blood for lab tests. Good IV access is critical in the management of patients who require anything but the most basic work-ups or therapies. As a sub-intern, being comfortable placing IVs can drastically speed up the care and comfort of your patient (on the order of hours in some cases!) in a busy ER where sicker patients may take precedence. Having IV access means labs can now be drawn and sent, and IV pain medications can be administered while they await more definitive therapy. Two huge wins for your patient and your team.
Here is a short video that shows all the steps succinctly. For some more great advice, check out Bobby Hannum's great posts on inserting IVs and pro tips.
Now that you've seen the basics, here are some helpful tips borne of painful personal experience to ensure a successful IV placement:
- Come prepared. Seriously. It sounds obvious, but the last thing you want to do is place your catheter then start fumbling around for the extension tubing or tegaderm, or worse yet, have to leave the room to track the missing piece down. Make sure you have all your supplies (first picture) and any necessary vacutainer tubes for labs prior to entering the room, and have them opened and assembled (second picture) to minimize the number of steps during the placement (e.g. locking the flush or vacutainer needle/hub into the extension tubing, and having your tape and tegaderm ready to go). Also, take a moment to consider whether the size of the catheter matters (are they going to need a contrast study later? Better go with the 18G).
*Not pictured, but very useful: a blue chuck placed under the patient's arm; Patients hate when you get blood on their
sheets.
|
- YOUR comfort is king. It sounds wrong, but really the patient just wants you get it over with quickly, and to do it once. Don't be afraid to position the patient, raise the bed, tie the tourniquet extra tight, or take a seat while you work. By asserting yourself you also come off as competent and experienced which can ease any anxiety the patient may have watching Doogie Howser, MD, wield a large, sharp needle at their arm.
- FEEL for the vein. Survey both arms, ask about AV fistulas, lymphedema, or local infections. If you don't see a good vein, don't give up or stick blindly, palpate for a vein and its trajectory instead.
- Drop your angle and apply countertraction. If you go in too steep you risk puncturing both the superficial and deep venous walls. If you got a good flash, however, retract your needle and carefully pull back on the catheter until blood flow returns, then advance just the catheter to better secure it inside the vein.
- Fail and move on. If you aren't successful relatively quickly, retract the needle and reset. From time to time you are going to miss your target, but if you aren't confident you can get it easily on a second attempt, it's best to put the patient's comfort first and understand your limits.

2. Laceration Repair:
 In terms of adding to value to your team and your patient, this is a huge win as a sub-intern. Repairing a lac can be a time-intensive process depending on the size of the wound and after you account for the additional time needed for irrigation, local anesthesia, and counseling the patient on wound care. In an ER with lots of sick patients to see, a simple lac could end up waiting hours before being addressed by a more senior member of the medical team. By becoming familiar with this procedure, you advance the care of your patient and free up your resident to manage other, more active patients in the ED.
Visit Closing the Gap. The website has a wealth of resources including: basic suturing technique, tying knots, wound irrigation data, and aftercare data. The author presents techniques in short, digestible videos, and backs up all his conclusions with the most up-to-date evidence available. Once you've explored the site, here are some helpful tips when repairing a laceration:
Some patients, classically patients with chronic kidney disease or severe hypovolemia, can be very difficult to perform venipuncture on. This can make drawing initial diagnostic labs a nightmare for nurses. However, the radial artery can be a reliable way to access blood for testing and cultures in even the most difficult of patients. Having the skill to quickly access the radial artery and draw blood can really advance your patient's care and save the more senior members of the team time. Here are some tips to help you successfully draw blood from the radial artery:
You may come across a patient who was triaged for a different complaint entirely, but is now experiencing palpitations or chest pain while you are in the room interviewing them. A more likely scenario is that a patient will come to the ED while coding or in a dangerous arrhythmia (e.g. new onset AFib) and you can help out the team by placing the patient on telemetry while CPR is continued, access is established, and medications are administered. Having this skill in your back pocket can instantly give you a way to contribute when emergent patients roll through the doors. Here is an easy way to remember which leads go where:
This is something that can't wait for an experienced person once it is needed, and in a chaotic ED with lots of sick patients you could be the only person close enough to do the job, or at least the most available to free up other members of the team. In other words, having the ability to do this correctly could be the only thing that allows the patient to adequately oxygenate her/his tissues until more help arrives or more definitive treatment is initiated. Knowing the correct technique is essential. Watch the video below; you may be very glad you did some day:
In terms of adding to value to your team and your patient, this is a huge win as a sub-intern. Repairing a lac can be a time-intensive process depending on the size of the wound and after you account for the additional time needed for irrigation, local anesthesia, and counseling the patient on wound care. In an ER with lots of sick patients to see, a simple lac could end up waiting hours before being addressed by a more senior member of the medical team. By becoming familiar with this procedure, you advance the care of your patient and free up your resident to manage other, more active patients in the ED. Visit Closing the Gap. The website has a wealth of resources including: basic suturing technique, tying knots, wound irrigation data, and aftercare data. The author presents techniques in short, digestible videos, and backs up all his conclusions with the most up-to-date evidence available. Once you've explored the site, here are some helpful tips when repairing a laceration:
- Come prepared. Just as with IV insertion, gather all your supplies ahead of time and discuss your plan with a resident or attending. Important things to consider: What type of stitch? What type/size suture? Should I inject lidocaine with or without epinephrine? And how much irrigation should be performed?
- Get comfortable. You are going to be at the bedside for a while so make sure you are comfortable. Raise the bed, take a seat, and position the patient such that you have an optimal space and vantage point to work from. Have a strong light source above the field. You should also make sure the patient is in a comfortable position as they will need to remain still while you are working. Included in this is being honest and realistic with the patient about how long the process will take - shortchanging the estimate will only lead to you looking bad when you inevitably go over the time you set, and the patient will be more likely to think something is going wrong.
- Anesthetize first, and TEST your work. Local anesthesia with lidocaine should be performed with a small gauge needle to limit pain. Insert the needle inside the wound edge at one of the corners and along the long axis of the wound until the needle is fully inserted or at the opposite corner. Pull back on the plunger to ensure you are not in a vessel and inject lidocaine as you withdraw the needle. It is helpful to prepare the patient for the initial burning sensation. Repeat along the opposite wound edge. Once the anesthetic starts to take effect, walk the needle tip along the skin edge to ensure adequate anesthesia in the desired area. This short video will give you a good idea of how to go about this process.
- Irrigate with pressure. A recent study in the BMJ showed that sterile saline offers no benefit vs. tap water in properly selected patients (non-immunocompromised, within 9 hours of trauma, not bite wounds, no tendon/bone involvement, no currently using antibiotics). However, you should use whatever is available and your team is comfortable using (usually 500 ml of sterile saline). Use a 35 ml syringe with 18G angiocatheter to supply appropriate pressure while irrigating.
- Bisect the wound with your stitches. Starting in the middle of a laceration can yield a more precise re-approximation of the skin edges and prevent bunching at the end of your suturing.
Some patients, classically patients with chronic kidney disease or severe hypovolemia, can be very difficult to perform venipuncture on. This can make drawing initial diagnostic labs a nightmare for nurses. However, the radial artery can be a reliable way to access blood for testing and cultures in even the most difficult of patients. Having the skill to quickly access the radial artery and draw blood can really advance your patient's care and save the more senior members of the team time. Here are some tips to help you successfully draw blood from the radial artery:
- Come prepared. I sound like a broken record, I know, but this point is so important in so many different settings it bears repeating. Come with all the supplies you need (see first picture below). I prefer to use the larger 21G (green) butterfly needle for this procedure as arteries, like veins, can constrict and roll out from under the needle during the procedure; a bigger needle prevents this and also is less likely to hemolyze your sample in this high pressure vessel. Finally, open and assemble everything together (second picture below) and have your vacutainer tubes handy as you will need to manipulate everything with one hand while you secure the needle in the artery.
*Not pictured, but very useful: a blue chuck placed under the patient's arm; Patients hate when you get blood on their
sheets.
|
- YOUR comfort is king. Once again, the patient just wants you to quickly access the artery, draw the blood, and move along. It's going to hurt and be uncomfortable for the patient no matter what, and that has little to do with where you position their arm. Raise the bed so you aren't hunched, abduct and supinate the patient's arm, and hold the wrist in extension to bring the artery closer to the skin.
- Palpate where the pulse is strongest and target that area. Unlike venipuncture, you won't be able to see the radial artery underneath the skin. Make sure you are confident of the pulse prior to inserting the needle.
- Go in steep with bevel pointed against the blood flow (away from the hand). Once you break the skin, be patient. Make small adjustments without removing the needle entirely. If you get a flash and lose flow carefully advance the needle farther, and if no flow is observed slowly pull back, you may have gone entirely through the vessel. Here is a video of a true ABG using an ABG kit and syringe. The process is basically the same for a butterfly needle except you need to be a bit more dexterous after you puncture the artery to manipulate the vacutainer tubes, syringes, and blood culture bottles while you hold the needle in place. You may find you have an easier go of it if you bring help during this part.
- Hold pressure. Unlike a veins, arteries are high pressure systems that can cause local bleeding when you remove your needle. You will need to hold firm pressure over the puncture after withdrawing the needle for several minutes to prevent hematoma formation - you may need to access that artery again, and a hematoma could prevent you from doing so!
You may come across a patient who was triaged for a different complaint entirely, but is now experiencing palpitations or chest pain while you are in the room interviewing them. A more likely scenario is that a patient will come to the ED while coding or in a dangerous arrhythmia (e.g. new onset AFib) and you can help out the team by placing the patient on telemetry while CPR is continued, access is established, and medications are administered. Having this skill in your back pocket can instantly give you a way to contribute when emergent patients roll through the doors. Here is an easy way to remember which leads go where:
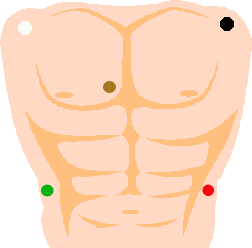
- Although the limb leads traditionally are placed on the limbs themselves, in this case, since we are going to leave the patient hooked up, it is necessary to place the leads on the torso so that the wires are more centralized and easier to manage. The limb leads should be placed on the anterior aspects of the shoulders and in the right and left lower quadrants as picture to the right. A simple way to remember which color corresponds to each of the five electrodes: imagine a man driving a car, his left arm is black from exposure to the sun out the window, his left leg is red on the brake, his right leg is green on the gas pedal, his right arm is white from no exposure to the sun (also remember the rhyme white on the right), and the remaining brown lead (V1) is chocolate so it is closest to his heart.
- Pro Tip: Attach the wires to the electrodes prior to sticking them on the patient, as it can be difficult to snap the wires into place once the electrodes are on the patient's body due to the give in the patient's tissues.
This is something that can't wait for an experienced person once it is needed, and in a chaotic ED with lots of sick patients you could be the only person close enough to do the job, or at least the most available to free up other members of the team. In other words, having the ability to do this correctly could be the only thing that allows the patient to adequately oxygenate her/his tissues until more help arrives or more definitive treatment is initiated. Knowing the correct technique is essential. Watch the video below; you may be very glad you did some day:
That's it! 5 ways you can add value to your team as a sub-intern. I hope this gives you at least a sense of how to integrate yourself into the team structure, and as your comfort level with emergency medicine grows over the course of the rotation, you will find more and more ways to contribute to the care of your patients.
You have good information....
ReplyDeleteMedical Billing Outsourcing
That is really good and informative blog, thanks for sharing such useful information in detail way with us. Looking forward for more such blogs
ReplyDeleteQuality content is the key to attract readers. And you provide just that. Good work.
ReplyDeletePlastic Surgeon Pasadena
Anesthesia Consultant Pasadena